Build management system with Raspberry pi and QR Part3
#JAはじめに
前回の続き。
今度は借りる人が、現在の貸出状況を確認できるようWeb周りを実装していきます。
Webフレームワーク
QR読み込みの部分はPythonで書いたのでWebの部分もPythonとDjangoにしようかと思いつつ、今回はPHPとSlimでやっていこうと思います。
PHPのWebフレームワークというとLaravelが人気ですが、今回はスリムにいきたいので、Slimにしました。
Slimのインストール
Slimをインストールするにはcomposerが必要なので先にインストール。
なにかエラーが出たら、phpのpackageが足りない可能性があるのでエラーメッセージを見て必要に応じてインストール。
$ curl -sS https://getcomposer.org/installer | php
$ sudo mv composer.phar /usr/local/bin/composer
slim-skeletonをベースにSlimアプリケーションを作成していきます。
今回はMDCというプロジェクト名をつけました。
$ composer create-project slim/slim-skeleton MDCでは、アプリケーションを動かしてみましょう。 ターミナルから以下のコマンドを実行してください。
$ php -S localhost:8080 -t publicブラウザでhttp://localhost:8080/ を開くと下記画面が開けるかと思います。
ルーティング
さて、デバイスとユーザー管理のために今回は下記のルーティングをセットします。
これにより、デバイスとユーザーの一覧表示、新規作成、1件表示、編集、削除ができるようになります。
GET /devices - デバイス一覧表示
GET /devices/create - デバイス新規登録用フォームの表示
POST /devices - デバイス新規登録
GET /devices/{id} - 貸出返却ログ表示
GET /devices/{id}/edit - デバイス情報編集用フォームの表示
PUT /devices/{id} - デバイス名更新
GET /devices/{id}/delete - デバイス削除用フォームの表示
DELETE /devices/{id} - デバイスの削除

GET /users - ユーザー一覧表示
GET /users/create - ユーザー新規作成用フォームの表示
POST /users - ユーザー新規登録
DELETE /devices/{id} - ユーザー削除
では、$app->get('/[{name}]', ...) の行より前に、以下のルーティングを追加します。
// デバイス一覧表示
$app->get('/devices', function (Request $request, Response $response) {
});

// デバイス新規登録用フォームの表示
$app->get('/devices/create', function (Request $request, Response $response) {
});

// 新規登録
$app->post('/devices', function (Request $request, Response $response) {
});

// 貸出返却ログ表示
$app->get('/devices/{id}', function (Request $request, Response $response, array $args) {
});

// 編集用フォームの表示
$app->get('/devices/{id}/edit', function (Request $request, Response $response, array $args) {
});

// デバイス名更新
$app->put('/devices/{id}', function (Request $request, Response $response, array $args) {
});

// デバイス削除フォーム
$app->get('/devices/{id}/delete', function (Request $request, Response $response, array $args) {
});

// デバイス削除
$app->delete('/devices/{id}', function (Request $request, Response $response, array $args) {
});

// ユーザー一覧
$app->get('/users', function (Request $request, Response $response) {
});

// ユーザー新規作成用フォームの表示
$app->get('/users/create', function (Request $request, Response $response) {
});

// ユーザー新規作成
$app->post('/users', function (Request $request, Response $response) {
});

// ユーザー削除
$app->delete('/users/{id}', function (Request $request, Response $response, array $args) {
});

$app->get('/[{name}]', function (Request $request, Response $response, array $args) {
});
データベース(sqlite)とのつなぎ込み
デバイスやユーザー一覧を表示するためには、デバイスの一覧情報が記録されているsqlite3で作成したDBファイルに
phpからアクセスする必要があるため、前の記事で作成したQRを読み取り記録するためのpythonコードとDB群を
publicディレクトリ配下に配置し、運用していきます。
device_manage.py
manage_device.db
user.db
phpのsqlite3パッケージをインストールすることで、ローカルのsqliteファイルにアクセスできます。
sudo apt install php7.2-sqlite3デバイス一覧画面
準備が整ったので、デバイス一覧を表示するためのルーティングから編集していきます。
// デバイス一覧表示
$app->get('/devices', function (Request $request, Response $response) {
    try {
        $pdo = new PDO('sqlite:manage_device.db');
        $pdo->setAttribute(PDO::ATTR_ERRMODE, PDO::ERRMODE_EXCEPTION);
        $pdo->setAttribute(PDO::ATTR_DEFAULT_FETCH_MODE, PDO::FETCH_ASSOC);
    } catch (PDOException $e) {
        echo 'Connection failed: ' . $e->getMessage();
        exit;
    }
    $sql = 'SELECT * FROM mdt';
    $stmt = $pdo->query($sql);
    $devices = [];
    while($row = $stmt->fetch()) {
        $devices[] = $row;
    }
    $data = ['devices' => $devices];
    if(file_exists('admin')){
        return $this->renderer->render($response, 'tasks/admin.phtml', $data);
    } else {
        return $this->renderer->render($response, 'tasks/index.phtml', $data);
    }
});
ここでは、"manage_device.db"にアクセスした後、下記SQLコマンドを実行し、
登録されているデバイス情報を取得し、$devicesに格納して、
管理者用の管理ページ(admin.phtml)または一般ユーザー用の管理ページ(index.phtml)にデータを渡します。
SELECT * FROM mdt;続いて、デバイス一覧画面のUIとなるテンプレートファイルを作成します。 templates ディレクトリの下に、tasks ディレクトリをつくり、そこに index.phtml という下記ファイルをつくります。
<!DOCTYPE html>
<html lang="ja">
<head>
  <meta charset="utf-8"/>
  <title>デバイス管理モニター</title>
  <link data-react-helmet="true" rel="icon" href="https://www.raspberrypi.org/homepage-9df4b/favicon.png"/>
  <link href="https://cdnjs.cloudflare.com/ajax/libs/twitter-bootstrap/4.0.0/css/bootstrap.min.css" rel="stylesheet" type="text/css">
</head>
<body>
<div class="container">
  <h1>デバイス管理モニター</h1>~
  <script>
  function doReload() {
      window.location.reload();
  }

  window.addEventListener('load', function () {
      setTimeout(doReload, 5000);
  });
  </script>
  <?php
    if(file_exists('login_user')){
        $fp = fopen('login_user', 'r');
        $login_user = "Hi! " . fgets($fp) . "-san";
        fclose($fp);
    } else {
        $login_user = "";
    }
  ?>
  <div class="card">
    <div class="card-body">
      <h2 class="card-title">デバイス一覧</h2>
      <h3><font color=red><?php echo htmlspecialchars($login_user, ENT_QUOTES, 'UTF-8', false); ?></font></h3>
      <table class="table table-bordered">
        <thead>
          <tr>
            <th>#</th>
            <th>デバイス名</th>
            <th>ステータス</th>
            <th>ユーザ名</th>
            <th>最終更新日時</th>
            <th>貸出返却ログ</th>
          </tr>
        </thead>
        <tbody>
          <?php foreach ($devices as $device): ?>
            <tr>
            <th scope="row"><?= htmlspecialchars($device['id'], ENT_QUOTES, 'UTF-8', false) ?></th>
            <td><?= htmlspecialchars($device['device_name'], ENT_QUOTES, 'UTF-8', false) ?></td>
            <td><?= htmlspecialchars($device['device_status'], ENT_QUOTES, 'UTF-8', false) ?></td>
            <td><?= htmlspecialchars($device['user_name'], ENT_QUOTES, 'UTF-8', false) ?></td>
            <td><?= htmlspecialchars($device['last_modify_date'], ENT_QUOTES, 'UTF-8', false) ?></td>
            <td><a href="/devices/<?= $device['id']?>" class="btn btn-primary">ログ</a></td>
            </tr>
          <?php endforeach; ?>
        </tbody>
      </table>
    </div>
  </div>
</div>
<script src="https://cdnjs.cloudflare.com/ajax/libs/jquery/3.3.1/jquery.min.js"></script>
<script src="https://cdnjs.cloudflare.com/ajax/libs/twitter-bootstrap/4.0.0/js/bootstrap.min.js"></script>
</body>
</html>
渡された$devicesに格納された情報をforeachで回して取り出し、htmlに出力しています。
なお、ログインしているユーザー名についてはログイン用のQRコードをかざしたときに
"login_user"というファイルが作成されるので、そのファイルをダイレクトに参照します。
header, footer
この先、似たようなヘッダーとフッダーを持つhtmlファイルをページごとに作るので
先にheader.phtmlとfooder.phtmlにまとめておく。
header.phtml
<!DOCTYPE html>
<html lang="ja">
<head>
  <meta charset="utf-8"/>
  <title>デバイス管理モニター</title>
  <link data-react-helmet="true" rel="icon" href="https://www.raspberrypi.org/homepage-9df4b/favicon.png"/>
  <link href="https://cdnjs.cloudflare.com/ajax/libs/twitter-bootstrap/4.0.0/css/bootstrap.min.css" rel="stylesheet" type="text/css">
</head>
<body>
<div class="container">
  <h1>デバイス管理モニター</h1>
footer.phtml
</div>
<script src="https://cdnjs.cloudflare.com/ajax/libs/jquery/3.3.1/jquery.min.js"></script>
<script src="https://cdnjs.cloudflare.com/ajax/libs/twitter-bootstrap/4.0.0/js/bootstrap.min.js"></script>
</body>
</html>
htmlspecialchars
XSS用に備えてhtmlspecialcharsを挟みましたが関数名が長いので、ヘルパー関数化してしまいます。
まず、src/helpers.php というファイルを作成して、以下のように"e"という関数を作ります。
<?php

if (!function_exists('e')) {
    function e(string $s): string {
        return htmlspecialchars($s, ENT_QUOTES, 'UTF-8', false);
    }
}
続いて、 composer.json に以下の記述を追加します。
    "autoload": {
        "files": ["src/helpers.php"]
    },
最後に、ターミナルから以下のコマンドを実行します。 これにより、"e"という関数が使えるようになりました。
$ composer duDemo
最終的に以下のようにまとめて、アプリケーションを動かしてみましょう。
<?= $this->fetch('header.phtml') ?>
<script>
function doReload() {
window.location.reload();
}
window.addEventListener('load', function () {
setTimeout(doReload, 5000);
});
</script>
<?php
if(file_exists('login_user')){
$fp = fopen('login_user', 'r');
$login_user = "Hi! " . fgets($fp) . "-san";
fclose($fp);
} else {
$login_user = "";
}
?>
<div class="card">
<div class="card-body">
<h2 class="card-title">デバイス一覧</h2>
<h3><font color=red><?php echo e($login_user);?></font></h3>
<table class="table table-bordered">
<thead>
<tr>
<th>#</th>
<th>デバイス名</th>
<th>ステータス</th>
<th>ユーザ名</th>
<th>最終更新日時</th>
<th>貸出返却ログ</th>
</tr>
</thead>
<tbody>
<?php foreach ($devices as $device): ?>
<tr>
<th scope="row"><?= e($device['id']) ?></th>
<td><?= e($device['device_name']) ?></td>
<td><?= e($device['device_status']) ?></td>
<td><?= e($device['user_name']) ?></td>
<td><?= e($device['last_modify_date']) ?></td>
<td><a href="/devices/<?= $device['id']?>" class="btn btn-primary">ログ</a></td>
</tr>
<?php endforeach; ?>
</tbody>
</table>
</div>
</div>
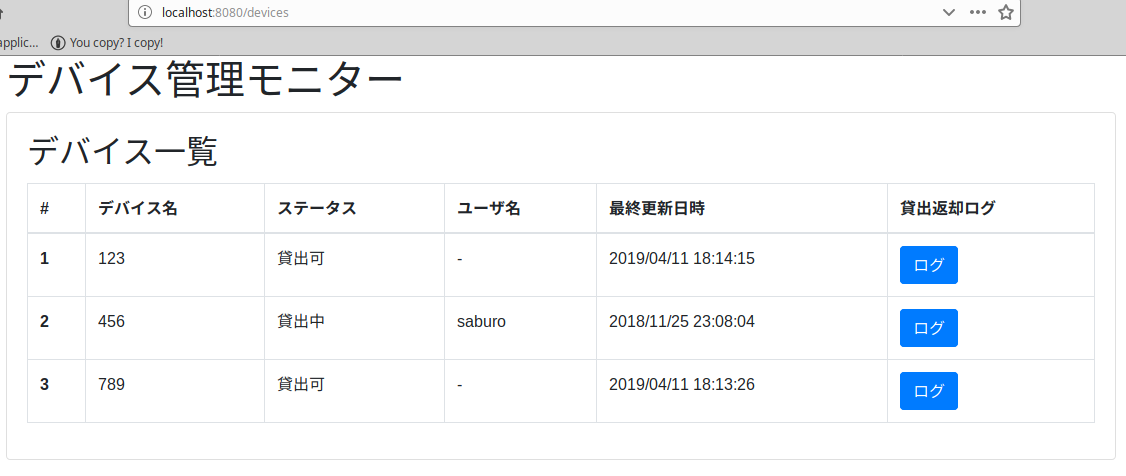
<?= $this->fetch('footer.phtml') ?>ターミナルから以下のコマンドを再度実行してください。
$ php -S localhost:8080 -t publicブラウザでhttp://localhost:8080/devices を開くと下記画面が開けるかと思います。
最後に一言
色々機能を追加しようとすると、route.phpが煩雑になりそうですね。
次回は他の機能を、実装していく予定です。